Docker Guide for Beginners
Docker - A Beginner’s Guide
This is a beginner’s guide to Docker. It is meant to be a quick reference for Docker commands and concepts. It is not meant to be a comprehensive guide to Docker. For more information, please refer to the official documentation.
Contents
- What is Docker?
- Why use Docker?
- Installing Docker
- Images and Containers
- Parent Images and DockerHub
- Dockerfile
- Docker Ignore
- Starting and Stopping Containers
- Managing Images and Containers
- Layer Caching
- Tagging Images
- Volumes
- Docker Compose
- Sharing Images on DockerHub
- Dockerising a React App
- Outro
What is Docker?
Docker is a tool that allows you to run applications in containers. Containers are similar to virtual machines, but they are more portable, more resource-friendly, and more dependent on the host operating system. Virtual machines have their own operating system but containers share the host operating system.
Why use Docker?
Let’s say your app uses a specific version of Nodejs. Now if your teammates want to use the app, they’d need to install the same version of Nodejs. But what if they have a different operating system? What if they have a different version of Nodejs?
Also, Node is just one dependency. What if your app uses 10 different dependencies? What if your app uses 100 different dependencies? What if your app uses 1000 different dependencies?
Docker solves this problem by allowing you to run your app in a container. This container will have all the dependencies your app needs. Now when your app needs to run, you can just run the container. This way, you don’t have to worry about installing dependencies on your machine.
Installing Docker
To install Docker, please refer to the official documentation.
Installing Docker on Mac or Linux is really straightforward but installing Docker on Windows is a bit complicated. To use docker on windows, we need WSL (Windows Subsystem for Linux).
WSL allows us to run a Linux environment on Windows without a virtual machine. To install WSL, please refer to the official documentation.
Once WSL is installed and set up, restart your computer and install Docker for Windows. You can check if Docker is installed by running the following command:
docker --version
Once installed, just open up docker desktop and you should be good to go.
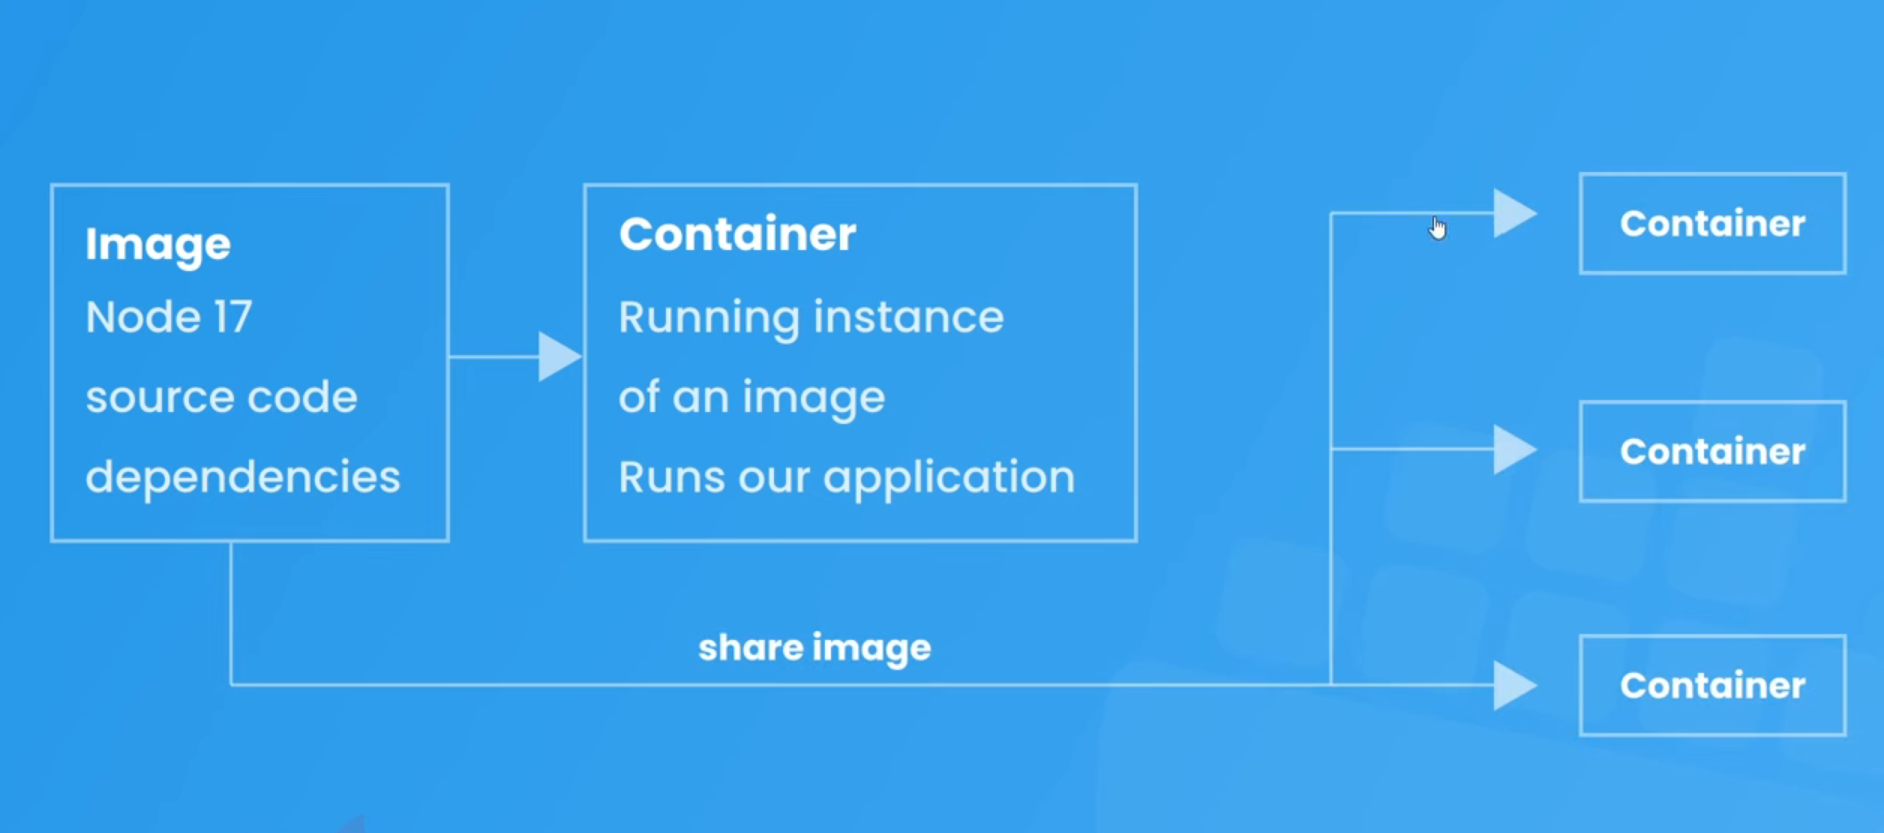
Images and Containers
There are some key terminologies you need to know before you can start using Docker. These are images and containers.
Docker Images
They are like blueprints for containers. They contain the following information inside them -
- Runtime Environment
- Application Code
- Application Dependencies
- Extra Configuration (eg. Environment Variables)
- Commands
Now images don’t actually run these things inside them. They are just blueprints. To run an image, we need to create a container.
Images are read-only. Once an image is created, it cannot be modified. If you want to modify an image, you need to create a new image.
Docker Containers
Containers are running instances of an image. They are created when an image is run. Containers run our application exactly as outlined in the image.
Containers are also known as isolated environments. This means that they are completely isolated from the host operating system. They have their own file system, their own networking, their own processes, etc.
This means that we can just share the docker image with anyone and they can run it on their machine without worrying about installing dependencies.
Parent Images and DockerHub
Images are made up of several layers where each layer adds something to the images incrementally. For example, the first layer might be the operating system, the second layer might be the runtime environment, the third layer might be the application code, and so on.
The first layer is called the parent image. It is the base image that all other layers are built on top of. It is also known as the base image. It usually contains the operating system and runtime environment.
DockerHub
Where does the parent image come from? Well, it comes from DockerHub. DockerHub is a repository of docker images. It contains thousands of images that you can use for your application.
Let’s say you want to run a Nodejs application. You can just search for Nodejs on DockerHub and you’ll find a bunch of images. You can then use one of these images as the parent image for your application.
The images can be pulled with the following command:
docker pull <image-name>
On the docker hub page for the image, you’ll find the tags for the image. These tags are used to specify the version of the image and the Linux distribution. For example, the following command will pull the Nodejs image with the tag 12.18.3-alpine3.12:
docker pull node:17-alpine
If we don’t specify a tag, Docker will pull the image with the default latest tag.
The Dockerfile
It is like a set of instructions for Docker to create an image. It lists all the commands to create those different layers. It also specifies the parent image.
The Dockerfile is usually placed in the root directory of the application. It is named Dockerfile. The name is case-sensitive. Each instruction in the file should be on a different line. Each line represents a different layer of the image.
Now let’s see how to write a Dockerfile.
Step 1: Specify the parent image
The first line should always be the parent image. For example, the following Dockerfile will create an image with the Nodejs 12.18.3 Alpine image as the parent image:
FROM node:17-alpine
This will download the Nodejs 12.18.3 Alpine image from DockerHub and use it as the parent image. The FROM keyword is used to specify the parent image.
Step 2: Specify the working directory
The next step is to specify the working directory. For example, the following Dockerfile will set the working directory to /app:
FROM node:17-alpine

WORKDIR /app
Here WORKDIR is used to set the working directory. So this will set the working directory to /app. If we don’t specify the working directory, Docker will use the root directory as the working directory which will be / in this case. It will affect us in step 4.
Step 3: Copy the application code
The next step is to copy the application code into the image. For example, the following Dockerfile will copy the application code into the /app directory of the image:
FROM node:17-alpine

WORKDIR /app

COPY ./api .
Here ./api represents the current directory. So this will copy all the files and folders from the current directory into the /app directory of the image. The COPY keyword is used to copy files and folders into the image.
Remember that the docker images have their own file system. So the /app directory is inside the image, not on the host operating system.
Step 4: Install dependencies
The next step is to install the application dependencies. For example, the following Dockerfile will install the application dependencies:
FROM node:17-alpine

WORKDIR /app

COPY ./api .

RUN npm install
Here RUN is used to run commands inside the image. So this will run the npm install command inside the image. Note that we don’t have to specify the WORKDIR here because we already specified it in step 2 otherwise the npm install command would have been run in the root directory.
Step 5: Expose the port
The next step is to expose the port. For example, the following Dockerfile will expose port 5000:
FROM node:17-alpine

WORKDIR /app

COPY ./api .

RUN npm install

EXPOSE 5000
Here EXPOSE is used to expose the port. So this will expose port 5000. This will be the port inside the container and not on the host operating system.
This is an optional step. If we run our app from the command line, we don’t have to expose the port.
Step 6: Specify the startup command
The last step is to specify the startup command. For example, the following Dockerfile will specify the startup command:
FROM node:17-alpine

WORKDIR /app

COPY ./api .

RUN npm install

EXPOSE 5000

CMD ["npm", "start"]
Here CMD is used to specify the startup command. So this will run the npm start command when the container is started. CMD is used to specify the command to run when the container is started.
Why didn’t we write
RUN npm start?The
RUNcommand is used to run commands when the image is being built. So if we writeRUN npm start, it will run thenpm startcommand when the image is being built. But we want to run thenpm startcommand when the container is started. So we use theCMDcommand instead.
Final Step: Building the image
Now that we have written the Dockerfile, we can build the image. Move to the directory where the Dockerfile is located and run the following command:
docker build -t <image-name> .
Here docker build is used to build the image. -t is used to specify the image name. . is the relative path to the Dockerfile from the current directory we are in.
So this will build the image with the name <image-name>.
dockerignore
The .dockerignore file is used to specify the files and folders that we don’t want to copy into the image. It is similar to the .gitignore file. It is also placed in the root directory of the application.
For example, the following .dockerignore file will ignore the node_modules folder:
node_modules
If we don’t specify the .dockerignore file, Docker will copy all the files and folders into the image. This will increase the size of the image, the time it takes to build the image, and may occasionally overwrite node_modules from the system’s to the container’s.
Starting and Stopping Containers
We can run the docker image to create a container out of it. It can either be done using Docker Desktop or the command line.
Docker Desktop
While running the image from Docker Desktop, we get some options in the GUI to set the Container Name, Port Mapping, Environment Variables, etc. We can also set these options using the command line.
Docker allows us to map a port from local host to the one running inside the container. So if we expose port 5000 inside the container, we can map it to port 8000 on the local host. This will allow us to access the application running inside the container from the browser on port 8000.
Note: We can only map a port that is exposed inside the container. So basically, we can only do it if we have specified the EXPOSE command in the Dockerfile.
Command Line
Getting the image name
To run any image, we need its name or id. We can get the name of the image using the following command:
docker images
This will list all the images. We can get the name of the image from here.
Running the image
To run the image, we can use the following command:
docker run --name <container-name> -p <host-port>:<container-port> -d -e <environment-variables> <image-name>
# docker run --name my-container -p 8000:5000 -d -e PORT=5000 <image-name>
Here docker run is used to run the image. --name is used to specify the container name. -p is used to specify the port mapping. -d is used to detach the container so it doesn’t block our terminal. -e is used to specify the environment variables. <image-name> is the name of the image.
If we don’t specify any port mapping, we won’t be able to access the application running inside the container from the browser. We will get a connection refused error.
Stopping a container
To stop a container, we can use the following command:
docker stop <container-name>
# docker stop my-container
Here docker stop is used to stop the container. <container-name> is the name of the container.
Starting a container
To start a container, we can use the following command:
docker start <container-name>
# docker start my-container
Here docker start is used to start the container. <container-name> is the name of the container. This time we don’t have to specify the port mapping, environment variables, etc. because we have already specified them while running the image.
Difference between docker run and docker start
docker run will always create a new container. So if we run the same image twice, it will create two containers. But docker start will start the container if it is stopped. So if we run the same image twice, it will create one container and start it. By default, docker start runs the container in detached mode.
Managing Images and Containers
Here are all the commands to manage images and containers.
List all the images:
docker images
List all the containers:
docker ps -a
List all the running containers:
docker ps
Remove an image:
docker image rm <image-name>
  # or
docker rmi <image-name>
Note: We can’t remove an image if there’s a container created from it. We have to remove the container first.
Remove an image forcefully (if there’s a container created from it):
docker image rm -f <image-name>
  # or
docker rmi -f <image-name>
Now the alternate way to remove an image that has a container created from it is to remove the container first and then remove the image.
Remove a container:
docker container rm <container-name>
  # or
docker rm <container-name>
Remove multiple containers:
docker container rm <container-name-1> <container-name-2> <container-name-3>
  # or
docker rm <container-name-1> <container-name-2> <container-name-3>
Remove all the images, containers, and volumes:
docker system prune -a
-a is used to remove all the images, containers, and volumes. if we don’t specify -a, it will only remove the unused images, containers, and volumes.
Layer Caching
At every step of the Dockerfile, Docker creates a layer and at every layer, it caches the images to that layer. So if we change something in the Dockerfile for step 4, Docker will only rebuild the image from step 4 and not from step 1. This is called layer caching.
This happens because when image was built initially, it was saved after each layer. So the image up until step 3 would already be saved. So when we change something in step 4, Docker will only rebuild the image from step 4 and not from step 1.
This saves a lot of time while building the image.
For example, let’s say the initial steps were:
FROM node:17-alpine # cached till layer 1

WORKDIR /app # images cached till layer 1 & 2

COPY ./api . # images cached till layers 1, 2 & 3

RUN npm install # images cached till layers 1, 2, 3 & 4
Here, each step will create a new layer in image and take some time. But now if we change something in step 3, Docker will only rebuild the image from step 3 and not from step 1. So the new steps will be:
FROM node:17-alpine

WORKDIR /app # cached image (till layers 1 & 2) will be used

COPY ./api ./app # changes will be made from here

RUN npm install # reruns since layers are built on top of each other
So, Docker will use cached images for the first 2 layers and then rebuild the image from the 3rd layer.
Refactoring the Dockerfile
In the above example, whenever we make a change in the code, Docker will rebuild the image from the 3rd layer, and hence the npm install command will run again and again. This will take a lot of time. So we can refactor the Dockerfile to make the npm install command run only when the package.json file changes.
FROM node:17-alpine

WORKDIR /app

COPY ./api/package.json ./app/package.json # copy only package.json

RUN npm install # run npm install

COPY ./api ./app
Now an image for the first 4 layers will be cached and can be reused again and again if there’s no change in package.json. So if we make a change in the code, Docker will only rebuild the image from the 5th layer and not from the 1st layer.
Tagging Images
We can create different versions of an image by using tags. By default, Docker will tag an image as latest. We can specify our own tag while building the image.
docker build -t <image-name>:<tag> .
  # docker build -t my-image:1.0 .
Now if we want to run this image, we can use the following command:
docker run --name <container-name> -p <host-port>:<container-port> -d -e <environment-variables> <image-name>:<tag>
  # docker run --name my-container -p 8000:5000 -d -e PORT=5000 my-image:1.0
Volumes
Volumes are a way to persist data in Docker. It allows us to map a folder on our local machine to a folder inside the container. So if we make any changes in the folder on our local machine, it will be reflected in the folder inside the container and vice versa.
Why do we need volumes?
Let’s say we writing some code to create some APIs. We have a Dockerfile to build an image and run a container. We have a folder called api which contains all the code. We have a Dockerfile which looks like this:
FROM node:17-alpine

WORKDIR /app

COPY ./api/package.json ./app/package.json

RUN npm install

COPY ./api ./app

CMD ["npm", "start"]
We build the image and run the container. Now we make some changes in the code and rebuild the image and run the container again. But this time, the container will have the old code because the container was created from the old image. So we have to remove the container and run the container again. This is not a good way to develop an application.
So we can use volumes to map the api folder on our local machine to the app folder inside the container. So if we make any changes in the api folder on our local machine, it will be reflected in the app folder inside the container and vice versa.
Note: Volumes don’t change the docker image. It only changes the container. So if we remove the container and run the container again, the changes will be lost. So we have to use volumes only for development purposes so that we don’t make a new image and run a new container every time we make a change in the code.
Using volumes
We can use volumes by using the -v flag while running the container to map a folder on our local machine to a folder inside the container.
docker run --name <container-name> -p <host-port>:<container-port> -rm -v <local-folder-abs-path>:<container-folder-path> <image-name>
  # docker run --name my-container -p 8000:5000 -v /Users/username/Desktop/api:/app my-image:1.0
-rm- remove the container when it stops running-v- map a folder on our local machine to a folder inside the container/Users/username/Desktop/api- absolute path of theapifolder on our local machine/app- path of theappfolder inside the container
Now if we make any changes in the api folder on our local machine, it will be reflected in the app folder inside the container and vice versa.
We can use something like nodemon to restart the server whenever we make a change in the code.
ISSUE - Since the /app inside container is in sync with the api folder on our local machine, the node_modules folder inside the container will be deleted because we ignore it using .dockerignore. To solve this issue, we can use the following command:
docker run --name <container-name> -p <host-port>:<container-port> -rm -v <local-folder-abs-path>:<container-folder-path> -v /app/node_modules <image-name>
  # docker run --name my-container -p 8000:5000 -v /Users/username/Desktop/api:/app -v /app/node_modules my-image:1.0
This is called anonymous volume. Here is how it works:
- Since the path for the second volume is more specific, it will override the path for the first volume.
- It doesn’t map the
node_modulesfolder to any specific directory as we did in the first volume. - Instead, it maps the
node_modulesfolder to a folder managed by Docker itself on our local machine. - Contents of this folder will persist even if the container stops running.
- Next time when we run the container, the
node_modulesfolder will be still mapped to that folder managed by Docker itself.
So basically, we used 2 volumes. One to map the api folder on our local machine to the app folder inside the container and another to map the node_modules folder inside the container to a folder managed by Docker itself on our local machine. Since the path for the second volume is more specific, it will override the path for the first volume.
Docker Compose
Docker Compose is a tool for defining and running multi-container Docker applications. Let’s say that we have different modules (database, API, frontend, etc.) in our application and each module has its own container and Dockerfile. So we have to build an image and run a container for each module.
Docker Compose allows us to do that with a single command.
docker-compose.yml
It allows us to define all the container configurations of our project in a single file called docker-compose.yml. It may contain port mapping, volumes, container names, etc.
Creating a docker-compose.yml file
We need to make it in the root directory where all of our different module folders are present.
Step 1: Specify the version of docker-compose you want to use
version: '3.8'
version is the version of docker-compose we want to use. We can find the latest version here.
Step 2: Define the services
services:
  <service-name>: <service-config>
serviceshas multiple nested properties and values.service-namerepresents the name of the service which will be one of the modules of our application.service-namecan be anything we want and it doesn’t have to be the same as the name of the module.- since it is a yml file, we have to use indentation to define nested properties and values.
service-configis the configuration of the service which will be one of the modules of our application.
Step 3: Define the configuration of the service
services:
  api:
    build: ./api
    container_name: api_container
    ports:
      - '8000':'5000'
    volumes:
      - ./api:/app
      - /app/node_modules
build- path to the folder which contains the Dockerfile for the servicecontainer_name- name of the containerports- port mappingvolumes- volumes (can be multiple) now only need the relative path from the directory where thedocker-compose.ymlfile is present to the directory which we want to map to the container
The idea is to define the configuration of each module in the docker-compose.yml file. So the containers for each of the module can be run with a single command.
Running the containers
Move to the directory where the docker-compose.yml file is present. Then we can run the containers for all the modules with a single command:
docker-compose up
Now the docker-compose file will be run to do the following things:
- Looks at the services one by one and reads the dockerfile for each service.
- Builds the image for each service with the configurations defined in the
Dockerfilefile. - Runs the container for each service with the configurations defined in the
docker-compose.ymlfile.
Stopping the containers
We can stop the containers for all the modules with a single command:
docker-compose down
Now the docker-compose file will be run to do the following things:
- Stops the containers for each service.
- Removes the containers for each service.
Note that this won’t remove the images and volume for each service.
To remove the images, we can use the following command:
docker-compose down --rmi all
Now to remove both images and volumes, we can use the following command:
docker-compose down --rmi all -v
Sharing Images on DockerHub
We can share our images on Docker Hub so that other people can use them. We can do that with the following steps:
Step 1: Create a Docker Hub account
We can create a Docker Hub account here.
Step 2: Login to Docker Hub
Once we have created a Docker Hub account, we can login to Docker Hub with the following command:
docker login
Step 3: Tag the image
docker tag <image-name> <docker-hub-username>/<image-name>:<tag>
-
image-nameis the name of the image we want to tag. -
docker-hub-usernameis the username of our Docker Hub account. -
tagis the tag we want to give to the image.
Step 4: Push the image
docker push <docker-hub-username>/<image-name>:<tag>
Now the image will be pushed to Docker Hub.
This is the CLI way of pushing the image to Docker Hub. We can also do it from the Docker Hub website by creating a repository and then pushing the image to that repository.
Dockerising a React App
We can use the following steps to dockerize a React App.
Step 1: Create a React App
npx create-react-app frontend
Step 2: Create a Dockerfile
FROM node:17-alpine

WORKDIR /app

COPY package.json .

RUN npm install

COPY . .

EXPOSE 3000

CMD ["npm", "start"]
Step 3: Configure docker-compose.yml file
version: '3.8'
services:
  api:
    build: ./api
    container_name: api_container
    ports:
      - '5000:5000'
    volumes:
      - ./api:/app
      - /app/node_modules
  frontend:
    build: ./frontend
    container_name: react-app_container
    ports:
      - '3000:3000'
      - ./frontend:/app
      - /app/node_modules
    stdin_open: true
    tty: true
Here we have 2 services - api and frontend. The api service is the same as the one we created earlier. The frontend service is the one we just created.
Since we are using stdin_open and tty for the frontend service, we can run the container for the frontend service in the interactive mode which will allow us to see the logs in the terminal. It’s always recommended to run a react app in the interactive mode.
Step 4: Run the containers
docker-compose up
Now we can see the react app running on localhost:3000 and the API running on localhost:5000. Both of them are running in independently of each other their own containers.
Outro
Thank you for checking out this cheat sheet!
If you found it helpful please check out more of my work on yodkwtf.com or follow me on twitter. I also run a small youtube channel called Yodkwtf Academy.